Photoshoを学んでいくと、
『これはどのように加工しているのだろう?』
という風に思うようになります。
町中を見回すと、映画のポスターや雑誌でも、Photoshopの技術が多く取り込まれていることに気が付いてきます。
今回は、人物と風景の2枚の写真を使って、
Photoshopで映画のポスター風にする方法
をご紹介します。
おしゃれでカッコいいポスターを作っていきましょう!
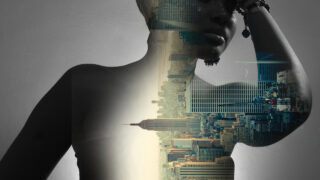
STEP1 人物画像に風景画を重ねる
①人物画像を開きます
![](https://i0.wp.com/tstreetband.com/wp-content/uploads/2021/06/2021-06-07_13h13_04.png?resize=913%2C668&ssl=1)
②エクスプローラー(MacはFinder)をクリックし、風景画をドキュメントウィンドウにドラッグします。
![](https://i0.wp.com/tstreetband.com/wp-content/uploads/2021/06/2021-06-07_13h13_28.png?resize=1024%2C576&ssl=1)
![](https://i0.wp.com/tstreetband.com/wp-content/uploads/2021/06/2021-06-07_13h13_49.png?resize=913%2C668&ssl=1)
③90度回転させ、サイズを拡大し人物画像の上に合わせてエンターキーを押します。
![](https://i0.wp.com/tstreetband.com/wp-content/uploads/2021/06/2021-06-07_13h15_07.png?resize=913%2C668&ssl=1)
![](https://i0.wp.com/tstreetband.com/wp-content/uploads/2021/06/2021-06-07_13h15_29.png?resize=913%2C668&ssl=1)
人物画像の上に風景画が配置されました。
STEP2 描画モードを変更する
①風景のレイヤー(ここではcity)を選択し、描画モードをカラー比較(明)を選択します。
![](https://i0.wp.com/tstreetband.com/wp-content/uploads/2021/06/2021-06-07_13h59_01.png?resize=372%2C656&ssl=1)
すると、人物画像と風景画が合成されました。
![](https://i0.wp.com/tstreetband.com/wp-content/uploads/2021/06/2021-06-07_13h16_33.png?resize=1024%2C576&ssl=1)
②レイヤーパネルの下部にある[レイヤーマスクを追加]を選択し、クリックします。
![](https://i0.wp.com/tstreetband.com/wp-content/uploads/2021/06/2021-06-07_14h03_01.png?resize=372%2C656&ssl=1)
STEP3 不要な部分にマスクをかける
①ブラシツールを選択し、
描画色:黒
ソフト円ブラシ
直径:400px
硬さ:0%
不透明度:30%
に設定します。
![](https://i0.wp.com/tstreetband.com/wp-content/uploads/2021/06/2021-06-07_13h17_49.png?resize=913%2C668&ssl=1)
②不要な部分にマスクをかけていきます。
![](https://i0.wp.com/tstreetband.com/wp-content/uploads/2021/06/2021-06-07_13h19_29.png?resize=913%2C668&ssl=1)
ブラシをかけて、人物画像と風景画をなじませていきます。
![](https://i0.wp.com/tstreetband.com/wp-content/uploads/2021/06/2021-06-07_13h20_53.png?resize=913%2C668&ssl=1)
これで完成です!
![](https://i0.wp.com/tstreetband.com/wp-content/uploads/2021/06/womanmodel.jpg?resize=683%2C1024&ssl=1)
今回は、トミナガハルキさん著の「#ズボラPhotoshop」を参考にさせていただきました。
初心者でも簡単にレタッチ加工ができますので、超おススメ本です!
リンク
コメント