こんにちは!カズキチです。
このブログに足を止めてくださりありがとうございます!
photoshopを中心に記事を書いているのでよかったら他の記事も見てくださると嬉しいです!
今回は、Photoshopで動物を金色にする方法です!
金色に装飾することで、高級感のあるオブジェのような表現をすることができます。
それでは、ご紹介します!
文字を金色にしたい人におススメな記事はこちら↓
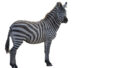
こちらの犬の画像を使ってご紹介します。
![](https://i0.wp.com/tstreetband.com/wp-content/uploads/2022/09/dog-gfc414b7f1_1920.jpg?resize=1024%2C683&ssl=1)
シャドウとハイライトを調整する
犬の画像を開いたら、「イメージ」→「色調補正」→「シャドウ・ハイライト」を選択します。
「シャドウ」の量を0%、ハイライトの量を20%に設定します。
![](https://i0.wp.com/tstreetband.com/wp-content/uploads/2022/09/2022-09-08_10h55_05.png?resize=457%2C277&ssl=1)
「背景」レイヤー複製し「ゴールドの質感」という名前にし非表示にします。
画像を単色にする
再度「背景」レイヤーを選択し「イメージ」→「色調補正」→「白黒」を選択します。
白黒ダイアログで「着色」にチェックを入れて「色相:42°」「彩度:80°」に設定し実行します。
その際レッド系~マゼンタ系の数値はそのままで大丈夫です。
![](https://i0.wp.com/tstreetband.com/wp-content/uploads/2022/09/2022-09-08_10h59_39.png?resize=461%2C532&ssl=1)
![](https://i0.wp.com/tstreetband.com/wp-content/uploads/2022/09/2022-09-08_13h04_53.png?resize=1024%2C468&ssl=1)
金属の質感を加える
「ゴールドの質感」レイヤーを表示し選択します。
次に「イメージ」→「色調補正」→「白黒」を選択し、初期設定のまま適用します。
![](https://i0.wp.com/tstreetband.com/wp-content/uploads/2022/09/2022-09-08_11h01_49.png?resize=461%2C532&ssl=1)
次に「フィルター」→「ぼかし」→「ぼかしガウス」を「半径:5pixel」で適用します。
![](https://i0.wp.com/tstreetband.com/wp-content/uploads/2022/09/2022-09-08_11h04_43.png?resize=347%2C343&ssl=1)
最後にレイヤーの描画モードを「覆い焼きカラー」に変換したら完成です!
![](https://i0.wp.com/tstreetband.com/wp-content/uploads/2022/09/2022-09-08_11h06_09.png?resize=1024%2C474&ssl=1)
![](https://i0.wp.com/tstreetband.com/wp-content/uploads/2022/09/gold-dog.jpg?resize=1024%2C683&ssl=1)
スタイリッシュな画像に仕上がりましたね!
元画像と比べてみましょう!
![](https://i0.wp.com/tstreetband.com/wp-content/uploads/2022/09/dog-gfc414b7f1_1920-1.jpg?ssl=1)
![](https://i0.wp.com/tstreetband.com/wp-content/uploads/2022/09/gold-dog-1.jpg?resize=1256%2C837&ssl=1)
![](https://i0.wp.com/tstreetband.com/wp-content/uploads/2022/09/marylou-fortier-mjXm9gYP4wE-unsplash-scaled.jpg?resize=1256%2C837&ssl=1)
![](https://i0.wp.com/tstreetband.com/wp-content/uploads/2022/09/goldhorse-scaled.jpg?resize=1256%2C837&ssl=1)
コメント