もう少し背景があれば、バランスの良い写真になったのに…
そのように思ったことはありませんか?今回は、そのような悩みを解消していきましょう。
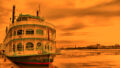
使用する写真はこちらです↓
![](https://i0.wp.com/k.tstreetband.com/wp-content/uploads/2021/03/children-5524878_1920-1024x683.jpg?resize=1024%2C683&ssl=1)
今回のメソッドは
Photoshopで写真の背景を増やす方法
です。上記の写真の左側にある、海の背景を増やしていきます。
STEP1 カンバスサイズを仕上げサイズに設定する
①[レイヤー]パネルの[背景]レイヤーサムネールを[option(Alt)]+ダブルクリックし、レイヤーへ変換する。右下の背景がレイヤー0に変換できたら成功。
![](https://i0.wp.com/k.tstreetband.com/wp-content/uploads/2021/03/スクリーンショット-23-1024x576.png?resize=1024%2C576&ssl=1)
②[イメージ]→[カンバスサイズ]を選択
![](https://i0.wp.com/k.tstreetband.com/wp-content/uploads/2021/03/スクリーンショット-24-1-1024x576.png?resize=1024%2C576&ssl=1)
③[カンバスサイズ]ダイアログで[幅]に増やしたいサイズを入力し、[基準位置]を選択して[OK]をクリック
(加えたい方向の逆側を指定します。今回は、左側の海を増やしたいので右の矢印をクリックします)
![](https://i0.wp.com/k.tstreetband.com/wp-content/uploads/2021/03/スクリーンショット-25-1024x576.png?resize=1024%2C576&ssl=1)
すると、このようにカンバスサイズが広がり、透明ピクセルで表示される。今回は左側を50mm増やしました。写真によっては、上部や下部を広げたいなどあると思います。増やしたい部分に合わせて調整してみましょう。
![](https://i0.wp.com/k.tstreetband.com/wp-content/uploads/2021/03/スクリーンショット-26-1024x576.png?resize=1024%2C576&ssl=1)
STEP2 保護する部分にマスクを作成する
①ツールパネルから[なげわツール]を選択し、保護したい部分を囲む
![](https://i0.wp.com/k.tstreetband.com/wp-content/uploads/2021/03/スクリーンショット-27-1024x576.png?resize=1024%2C576&ssl=1)
②[選択範囲]メニュー→[選択範囲を変更]→[境界をぼかす]を選択し、[ぼかしの半径]に16pixelを入力してOKをクリック
![](https://i0.wp.com/k.tstreetband.com/wp-content/uploads/2021/03/スクリーンショット-28-1024x576.png?resize=1024%2C576&ssl=1)
![](https://i0.wp.com/k.tstreetband.com/wp-content/uploads/2021/03/スクリーンショット-29-1024x576.png?resize=1024%2C576&ssl=1)
③[チャンネル]パネルで、[選択範囲をチャンネルとして保存]をクリックし、「アルファチャンネル1」を作成
![](https://i0.wp.com/k.tstreetband.com/wp-content/uploads/2021/03/スクリーンショット-31-1024x576.png?resize=1024%2C576&ssl=1)
④選択を解除
STEP3 [コンテンツに応じて拡大・縮小]で画像を変形する
①[編集]→[コンテンツに応じて拡大・縮小]を選択
②オプションバーの[適用量]に100%を入力し、[保護]に[アルファチャンネル1]を選択
③画像に表示されたバウンディングボックスをドラッグして変形し、Eenterキーを押して変形を確定
![](https://i0.wp.com/k.tstreetband.com/wp-content/uploads/2021/03/スクリーンショット-33-1024x576.png?resize=1024%2C576&ssl=1)
このように左側の海の部分を増やすことができました。これで完成です!
それでは原本と拡大版を比べてみましょう。
before
![](https://i0.wp.com/k.tstreetband.com/wp-content/uploads/2021/03/children-5524878_1920-1024x683.jpg?resize=1024%2C683&ssl=1)
after
![](https://i0.wp.com/k.tstreetband.com/wp-content/uploads/2021/03/子ども拡大後-1024x499.jpg?resize=1024%2C499&ssl=1)
海の部分が不自然なく広がりました。
他の作品でも比べてみましょう。
before
![](https://i0.wp.com/k.tstreetband.com/wp-content/uploads/2021/03/sheep-4445992_1920-1024x682.jpg?resize=1024%2C682&ssl=1)
after
![](https://i0.wp.com/k.tstreetband.com/wp-content/uploads/2021/03/羊拡大後-1024x498.jpg?resize=1024%2C498&ssl=1)
右側の背景が広がりました。羊が立つ野原も広がっていますね。
簡単にできますのでチャレンジしてみてくださいね!
コメント